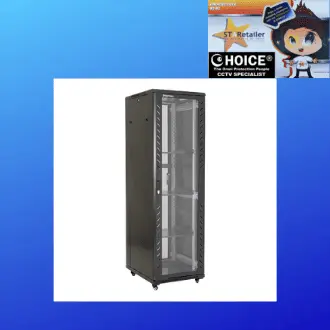
Side panel lock Server Racks IT Department Server Rack Wall Mount Standing Rack CCTV DVR-NVR Rack for POE Switch Fiber Optics Government Ministry School Server
in stock
$65.00
CHOICE Brand and SGCCTV Brand are Singapore IPOS Trade Mark Registered.
Widely deployed in Shopping Malls, Residential, Commercial, Office, Warehouse.
Compatible with ALL DVR & NVR ONVIF protocols.
Great Technical Support at Sim Lim Square 02-81 11am~7pm Daily +65 98534404
in stock
Side panel lock Server Racks IT Department Server Rack Wall Mount Standing Rack CCTV DVR-NVR Rack for POE Switch Fiber Optics Government Ministry School Server
CHOICECYCLE CCTV offer the best price Side panel lock Server Racks IT Department Server Rack Wall Mount Standing Rack CCTV DVR-NVR Rack for POE Switch Fiber Optics Government Ministry School Server
Locking steel panel attaches to the side of your 48U-based server rack enclosure.
- Pre-installed latches lock securely with included keys to protect equipment from theft
- Ideal as replacement panel or for expansion rack cabinets
- Made from heavy-duty steel engineered to stand up to busy IT environments
- Designed for use with 42 in. (1050 mm) depth, 48U rack enclosures
- Fits models based on the 48U frame design
- 5-year limited warranty
1. Collection from SGCCTV Choicecycle Sim Lim Square CCTV SPECIALIST #02-81 11am~8pm. Whatsapp 90254466 for stock level before visit.
Installing a side panel with key-locking latches for a 48U server rack cabinet typically involves several steps:
Tools and Materials Needed:
- Side panel with key-locking latches
- Screwdriver or appropriate tool for the rack screws
- Possibly additional hardware that comes with the side panel
- Gloves (optional for handling the rack and panels)
Steps:
- Prepare the Area: Make sure the area around the server rack is clear and accessible. Ensure the server rack is stable and won’t tip over during the installation.
- Unboxing and Inspection: Unbox the side panel and inspect it for any damage or missing parts. Verify that you have all the necessary components before starting the installation.
- Orientation: Identify the correct side panel for the rack. It’s usually labeled or designed specifically for the left or right side of the cabinet.
- Rack Access: Open the server rack cabinet and locate the side where you intend to install the new panel.
- Remove Existing Panel (if applicable): If there’s already a panel on that side, you’ll need to remove it. Unscrew any screws holding it in place and carefully lift it away from the rack. Set it aside.
- Align the New Panel: Hold the new side panel next to the rack to align it properly. Ensure the screw holes on the panel align with the corresponding holes on the rack.
- Secure the Panel: Once aligned, carefully slide or place the new side panel onto the rack. Use the provided screws or hardware to secure the panel firmly. Ensure it’s snugly attached but not overly tightened.
- Check the Locking Mechanism: If your side panel comes with key-locking latches, test the locking mechanism to ensure it functions correctly. Insert the key, turn it, and verify that it securely locks the panel in place.
- Test the Panel: Gently push and pull the panel to check its stability. Make sure it doesn’t wobble or come loose.
- Repeat (if necessary): If you’re installing side panels on both sides of the server rack, repeat the above steps for the other side.
- Clean Up: Dispose of any packaging materials and tools no longer needed. Double-check that the area around the server rack is clear and safe.
Always refer to the specific instructions provided with your side panel and server rack for any manufacturer-specific guidelines or additional steps. If you’re unsure or uncomfortable with any step, it’s a good idea to consult a professional or the manufacturer’s support.
Side panel lock Server Racks IT Department Server Rack Wall Mount Standing Rack CCTV DVR-NVR Rack for POE Switch Fiber Optics Government Ministry School Server
Nunc lacus elit, faucibus ac laoreet sed, dapibus ac mi. Maecenas eu ante a elit tempus fermentum. Aliquam commodo tincidunt semper. Phasellus accumsan, justo ac mollis pharetra, ex dui pharetra nisl, a scelerisque ipsum nulla ac sem. Cras eu risus urna. Duis lorem sapien, congue eget nisl sit amet, rutrum faucibus elit.
Donec accumsan auctor iaculis. Sed suscipit arcu ligula, at egestas magna molestie a. Proin ac ex maximus, ultrices justo eget, sodales orci. Aliquam egestas libero ac turpis pharetra, in vehicula lacus scelerisque. Vestibulum ut sem laoreet, feugiat tellus at, hendrerit arcu.
Nunc lacus elit, faucibus ac laoreet sed, dapibus ac mi. Maecenas eu ante a elit tempus fermentum. Aliquam commodo tincidunt semper. Phasellus accumsan, justo ac mollis pharetra, ex dui pharetra nisl, a scelerisque ipsum nulla ac sem. Cras eu risus urna. Duis lorem sapien, congue eget nisl sit amet, rutrum faucibus elit.


1 review for Side panel lock Server Racks IT Department Server Rack Wall Mount Standing Rack CCTV DVR-NVR Rack for POE Switch Fiber Optics Government Ministry School Server
There are no reviews yet.